


Building an extension system on the Web is not an easy task. In an environment full of quirks and various security weak points to be aware of, an extension system becomes more of a liability than a feature. However, when executed well, a good extension system can bring a ton of value to your Web app, expanding not only its functionality but also potential use cases.
That’s why I was really excited to try and bring such functionality to Vrite — an open-source headless CMS for technical content — with the goal of making content delivery easier, the editing experience more customizable, and Vrite as a whole — more versatile.
While it is still pretty early, I’m excited to announce the first results of this work in the form of Dev.to and Hashnode auto-publishing Vrite Extensions.
In this blog post, I’d like to provide a short overview of the research and development behind this extension system and give you a first look at these new Vrite Extensions. Let’s jump in.
Building Extension Systems on the Web
Before you start building an extension system you need to have at least a basic overview of its architecture and goals. “What parts of the app should be extendable?”, “How the installation/configuration process will look like?”, etc.
Vrite is an open-source headless CMS. This means I had not only a lot of options as to what should be customizable but also in regards to how it should be implemented. I easily could just build an API that plugs into a self-hosted Vrite instance directly and runs anything the user asks it to. It wouldn’t be secure, but it’d be the easiest, most versatile way to achieve this. However, that’s not what I wanted to do.
Security in the Cloud
I like to think of Vrite as an open-source, but cloud-first CMS. This means that, while you can view the source code and host Vrite yourself, its features are all intended to work well and be experienced best on the official, “Vrite Cloud” instance.
For this approach, an extension system like described isn’t a good choice. You simply cannot allow untrusted code to freely run in your app, especially if it’s meant to be used by many users. Rather, I need a system that can run such code securely, without accessing any parts of the app it’s not supposed to. That’s a bit more challenging.
Running Untrusted Code on the Web
This gets us to the core problem that every extension system has to face, i.e. how to securely run untrusted code?
While not widespread, this is a pretty popular need, both for extension systems and other use cases. Thus, there are a few sources you can use as a reference. For me, the most useful piece on this topic by far came from Figma’s blog, describing how they have built their own plugin system. Even though it’s almost 4 years old by now, not much has changed in this period, and I can easily recommend it as a valuable read — whether you’re working on an extension system or not.
Based on this post and other sources, here are the solutions I’ve considered:
- WASM-based JavaScript interpreter — while technically a good choice, I don’t feel confident in my experience and knowledge of WASM and languages like C to implement this solution; With limited time and indie-level resources (compared to a full start-up like Figma), creating and maintaining a WASM-based interpreter was a no-go;
- JS-based JavaScript interpreter — even though it was a more reassuring option for me (especially with some projects already available in this space), a JS interpreter written in JS simply isn’t a performant solution;
- ShadowRealms — a successor of the Realms proposals, this API is intended for use cases exactly like plugins or extension systems, providing an option for creating distinct global environments to run the code in. While not entirely secure on its own, this API could provide a strong foundation to build actual extension systems on the Web. That said, 4 years later, the TC39 proposal is currently only at stage 3, not implemented by any browser;
- iframe sandbox — seemingly the most “officially-supported” way to sandbox and run untrusted code on the Web. While it is standardized and secure, it does require async communication with the sandbox and structured cloning of the sent data;
There are other potential solutions I haven’t explored close enough (like Endo and SES), or completely omitted as they’re based on an imperfect blacklist-based approach to security (like sandboxed WebWorkers). However, the mentioned 4 solutions are the top contenders, at least in my mind.
Ultimately, I decided to go with sandboxed iframes, as they’re both standardized and already well-tested. Compared to Figma, I didn’t intend to send large amounts of data between frames and async communication wasn’t a problem for me.
That said, I still had to figure out how to create a system for extending the UI.
Extending the UI
While there are many potential ways to run untrusted code, there are only so many ways to extend UI. In case you want the user to have complete control — you should use iframes. Otherwise, you’ll have to create some sort of custom UI building system that allows users to define custom UI.
I wanted Vrite UI to feel somewhat cohesive - even with the extensions. That’s why I opted for a custom, more controlled system. However, you can’t just allow the user to define it with JS code. Given that all this untrusted code will be running in a sandbox, building the UI there and then keeping it up-to-date via async messages going back and forth won’t allow for a fluid user experience. You need to somehow keep the UI in the main frame, with easy access to the DOM.
Inspired by existing UI extension systems like Slack’s Block Kit and frameworks such as Vue or Svelte and their Single File Components, I decided to create a JSON-based templating syntax.
Why? First off, JSON is a pretty secure and ubiquitous data format, meaning it’s well-supported on the Web and requires no JS code to run or worry about. As for the templating part — you need the user to define all the data bindings ahead of time so that the UI can be connected and kept up-to-date. Because of this, a dynamically-rendered approach like in e.g. React and JSX won’t work — you need a predefined template.
With both of the most important parts of the extension system figured out, it was time to get into the code and define a specification.
Defining the Specification
To keep the system performant, the idea was, to only run extension code in reaction to specific events, like user interactions or extension’s lifecycle callbacks. This meant that I’ll need an entry file and specification for defining the UI templates and what callbacks should be used for various events. The working name for this file became spec.json.
The Entry File
{
  "name": "dev",
  "displayName": "Dev.to",
  "description": "Automatically publish and update articles on Dev.to",
  "permissions": ["contentGroups:read"],
  "lifecycle": { "on:configure": "configure" },
  "configurationView":
    [
      {
        "component": "Field[type=text][color=contrast]",
        "props":
          {
            "label": "API key",
            "placeholder": "API key",
            "bind:value": "config.apiKey"
          },
        "slot:": "Your Dev.to API key. You can generate one in the [settings page](https://dev.to/settings/extensions), under **DEV Community API Keys** section"
      },
      {
        "component": "Button[color=primary].w-full.flex.justify-center.items-center.m-0",
        "props": { "bind:disabled": "temp.disabled", "on:click": "publish" },
        "slot:":
          {
            "component": "Show",
            "props": { "bind:value": "temp.$loading" },
            "slot:true": { "component": "Loader" },
            "slot:false":
              {
                "component": "Text",
                "props": { "bind:value": "temp.buttonLabel" }
              }
          }
      }
    ]
}
The spec.json file defines things such as the extension’s metadata and permissions. The idea was to base the extension system heavily on the things already existing in Vrite like its API, permission system, or UI components to accelerate development and build stronger foundations.
Templating Syntax
The templating syntax itself was kept minimal and intended to be both understandable for humans and easy to parse for fast UI rendering. To do so, I established a few rules:
- The
on:prefix is meant for binding the specific event (component prop underneath) to the given Function (referenced by name); - The
bind:prefix is used for defining reactive bindings of component props to available data; - The slots (with
slot:prefix) are meant for defining child elements; The most-often used default slot (slot:default) has a specialslot:shortcut, while some components (likeShow) can accept multiple slots to e.g. switch dynamically between them; - For non-reactive props and class names, a shortcut syntax was added, inspired by CSS selectors, e.g.
Field[type=text]orButton.w-full;
Functions
All custom JS code was separated into Functions which can be defined in a separate folder and referenced in spec.json via their file name. The functions themselves will run in the sandbox, thanks to which they can securely use all APIs available in the browser, like fetch():
// functions/publish.ts
import { ExtensionContentPieceViewContext } from '@vrite/extensions';

const publish = async (
  context: ExtensionContentPieceViewContext
): Promise<void> => {
  try {
    context.setTemp('$loading', true);

    const response = await fetch('https://extensions.vrite.io/dev', {
      method: 'POST',
      headers: {
        Authorization: `Bearer ${context.token}`,
        'X-Vrite-Extension-Id': context.extensionId,
        'Content-Type': 'application/json',
      },
      body: JSON.stringify({
        contentPieceId: context.contentPiece.id,
      }),
    });
    const data = await response.json();
    if (!response.ok || !data.devId) {
      throw new Error("Couldn't publish to Dev.to");
    }
    if (context.data.devId) {
      context.notify({ text: 'Updated on Dev.to', type: 'success' });
    } else {
      context.notify({ text: 'Published to Dev.to', type: 'success' });
    }

    if (
      !context.contentPiece.locked &&
      data.devId &&
      data.devId !== context.data.devId
    ) {
      context.setData('devId', data.devId);
    }

    context.setTemp({
      $loading: false,
      buttonLabel: 'Update',
    });
  } catch (error) {
    context.notify({ text: "Couldn't publish to Dev.to", type: 'error' });
    context.setTemp('$loading', false);
  }
};

export default publish;
All Functions receive context as an input parameter. It gives them access to all the data and tools they need, specific to the context they’re running in. For example, all functions have access to a Vrite API client and token with all the permissions that were specified in spec.json. However, only a function running in contentPieceView has access to the content piece’s metadata (via context.contentPiece) and can read/write custom data related to it (via context.data and context.setData()).
After the function finishes execution, the context is processed, and updated data is sent back to the main frame to update the UI.
In case you need to update the UI dynamically, before the function finishes its execution, e.g. to indicate a loading state, you can prefix the specific custom property name with $, e.g. $loading. Such a property, when updated, will be immediately synced with the UI.
Putting it All Together
With solutions to all of the biggest problems and a somewhat sensible specification, we’re still only halfway there.
Building support for an extension system into your app is an entirely separate endeavor. While there are infinite ways to go about it, here are a few challenges I have faced:
- Implementing the iframe sandbox — JetBrains’ Websandbox library was of great help to me in implementing this; If you’re using a bundler like Vite or Webpack, you’ll also likely have to bundle your sandbox code in as a separate script for optimal development workflow;
- Loading the extensions and related functions —
fetch()and dynamicimport()are your friends. There are a lot of interesting details I’ve discovered about native ES Modules when working on this, so you can expect a separate post on this topic soon! - Rendering UI templates — building a “UI template renderer” isn’t too easy — especially when you want to bind props and keep things reactive. This was a pretty challenging, but interesting process and led me to learn more than ever about reactivity in Solid.js (UI framework powering Vrite)
- Bundling extensions — in general, custom extension formats require custom bundling tools. Currently, as it’s still early, I put everything into a single JSON file with Node.js and esbuild bundler, but I’m exploring how to develop a custom Vite plugin for this purpose;
Vrite Publishing Extensions
So, with all said and done, I’ve managed to create the first version of a working Vrite Extension System. While it doesn’t have many features yet, it has access to Vrite API and can create custom UIs for extension configuration and content piece metadata settings.
This is a minimal, but perfect feature set for the two extensions I wanted to create first — for DEV and Hashnode Auto-Publishing. With both extensions publishing everything from the content and its title up to the tags and canonical links — it’s the first step to simplifying content delivery in Vrite and making technical blogging and cross-posting a breeze!
If you’re unfamiliar with any of the following Vrite terminology, check out Vrite Usage Guide for some clarification :)
Installation and Usage
To install an extension, go to the Extensions section from the side menu. Here you can install one of the available extensions by clicking Install.
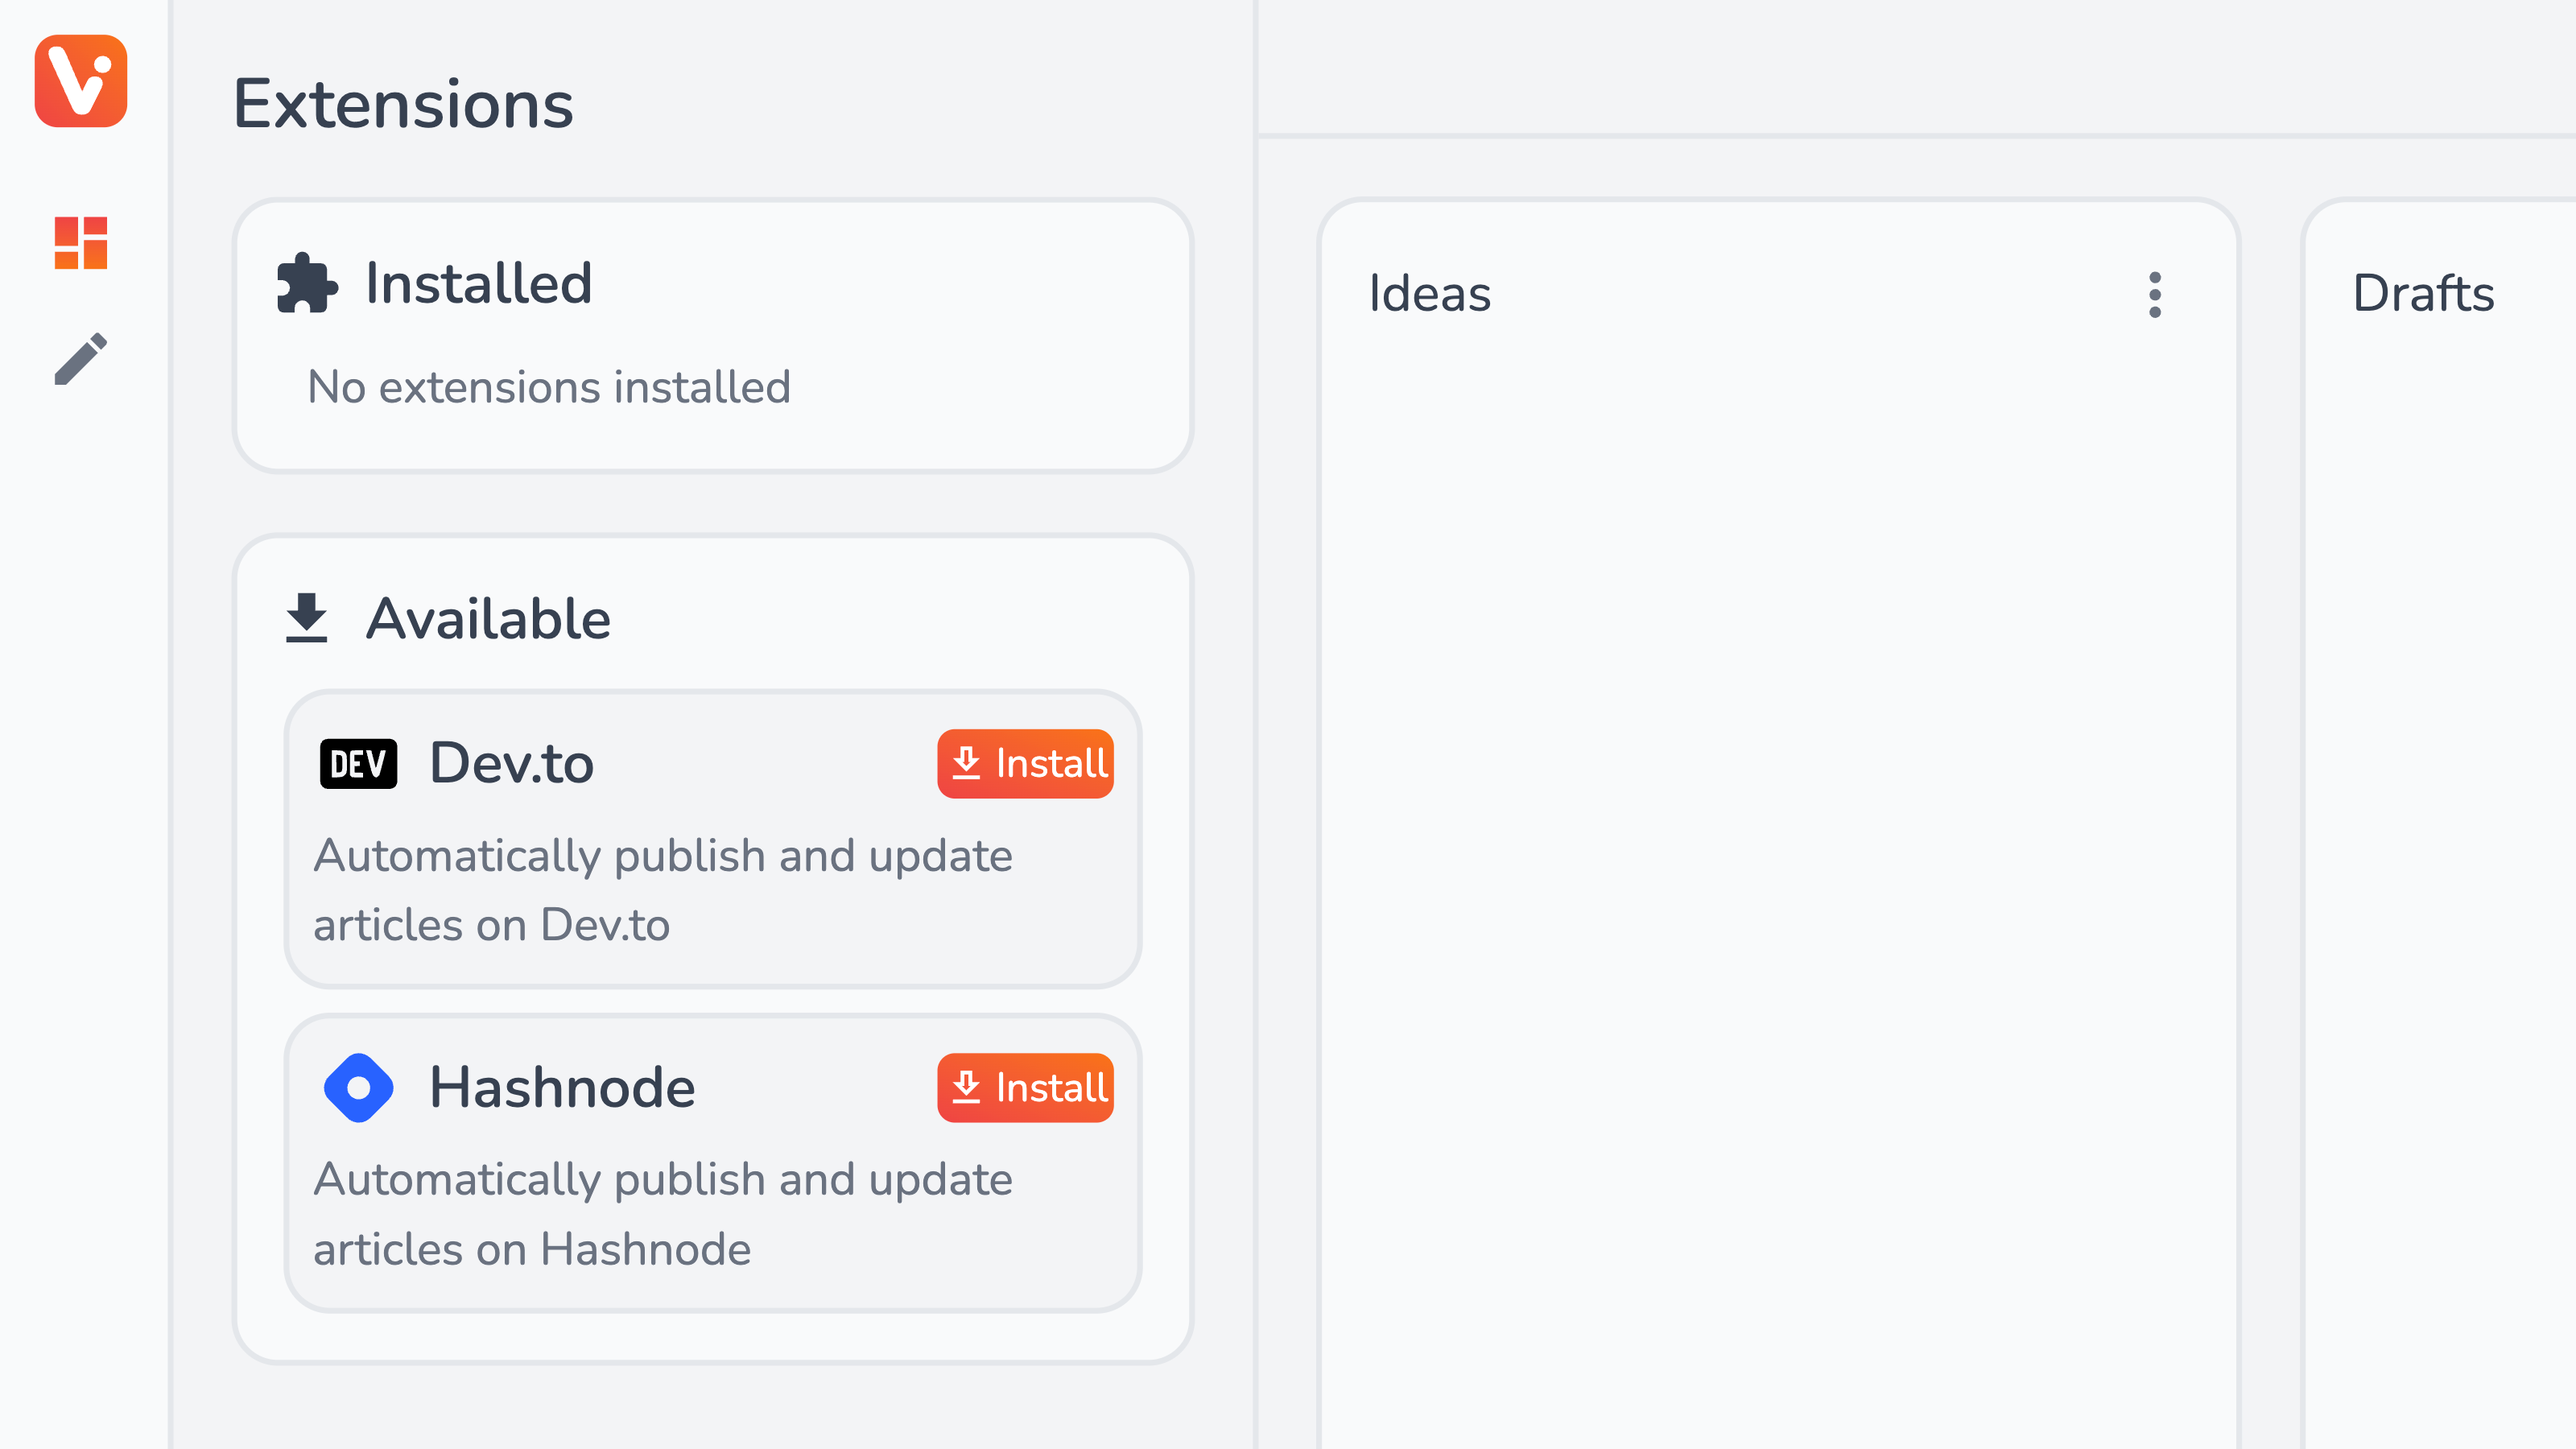
The extension will be installed and you’ll be taken to a Configuration menu.
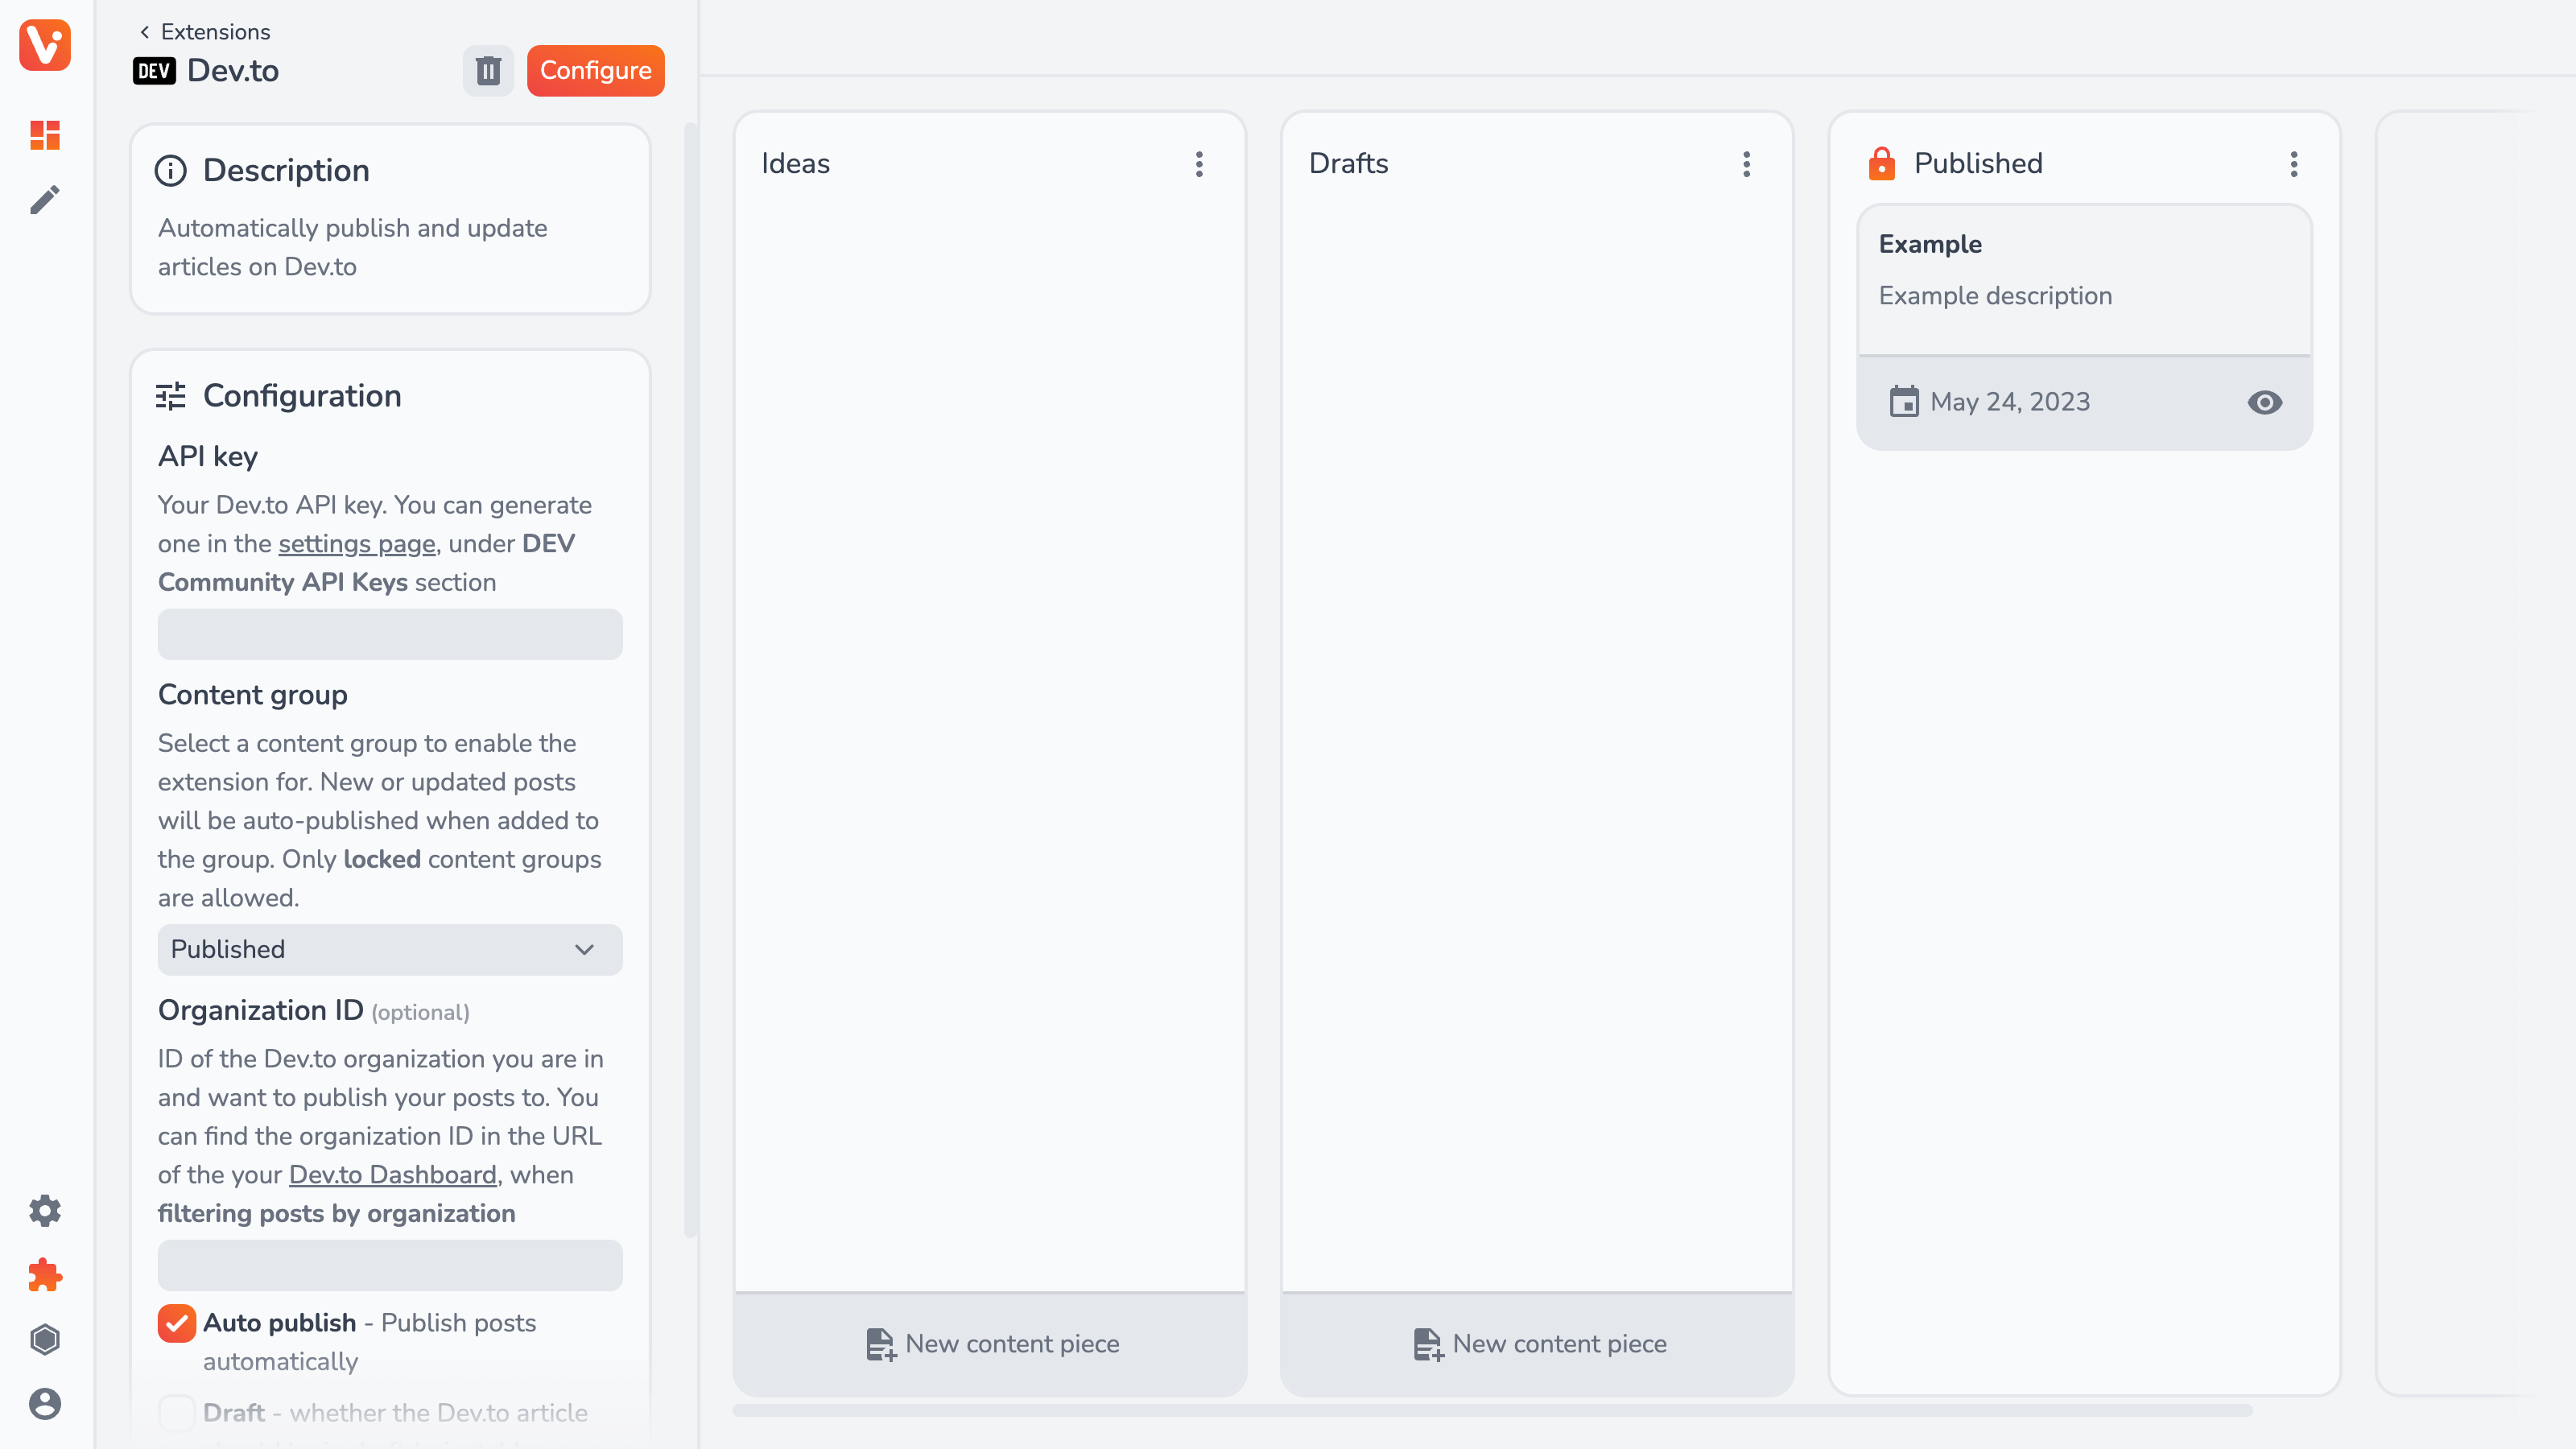
Dev.to Publishing
In the case of the Dev.to publishing extension, you can/have to configure the following options:
- API key — from your Dev.to settings, necessary to authenticate with Forem API;
- Content Group — a locked content group from which, when a content piece is added, it’ll be published;
- Organization ID (optional) — if publishing on DEV as an organization, you need to provide its ID;
- Auto publish — whether or not to register Webhooks for auto-publishing; if not, you can still publish manually from the content piece view;
- Draft — whether the article on DEV should default to draft state (be invisible to the public);
- Require canonical link — whether to auto-publishing (in case it’s enabled) when no canonical link is added (useful for cross-posting)
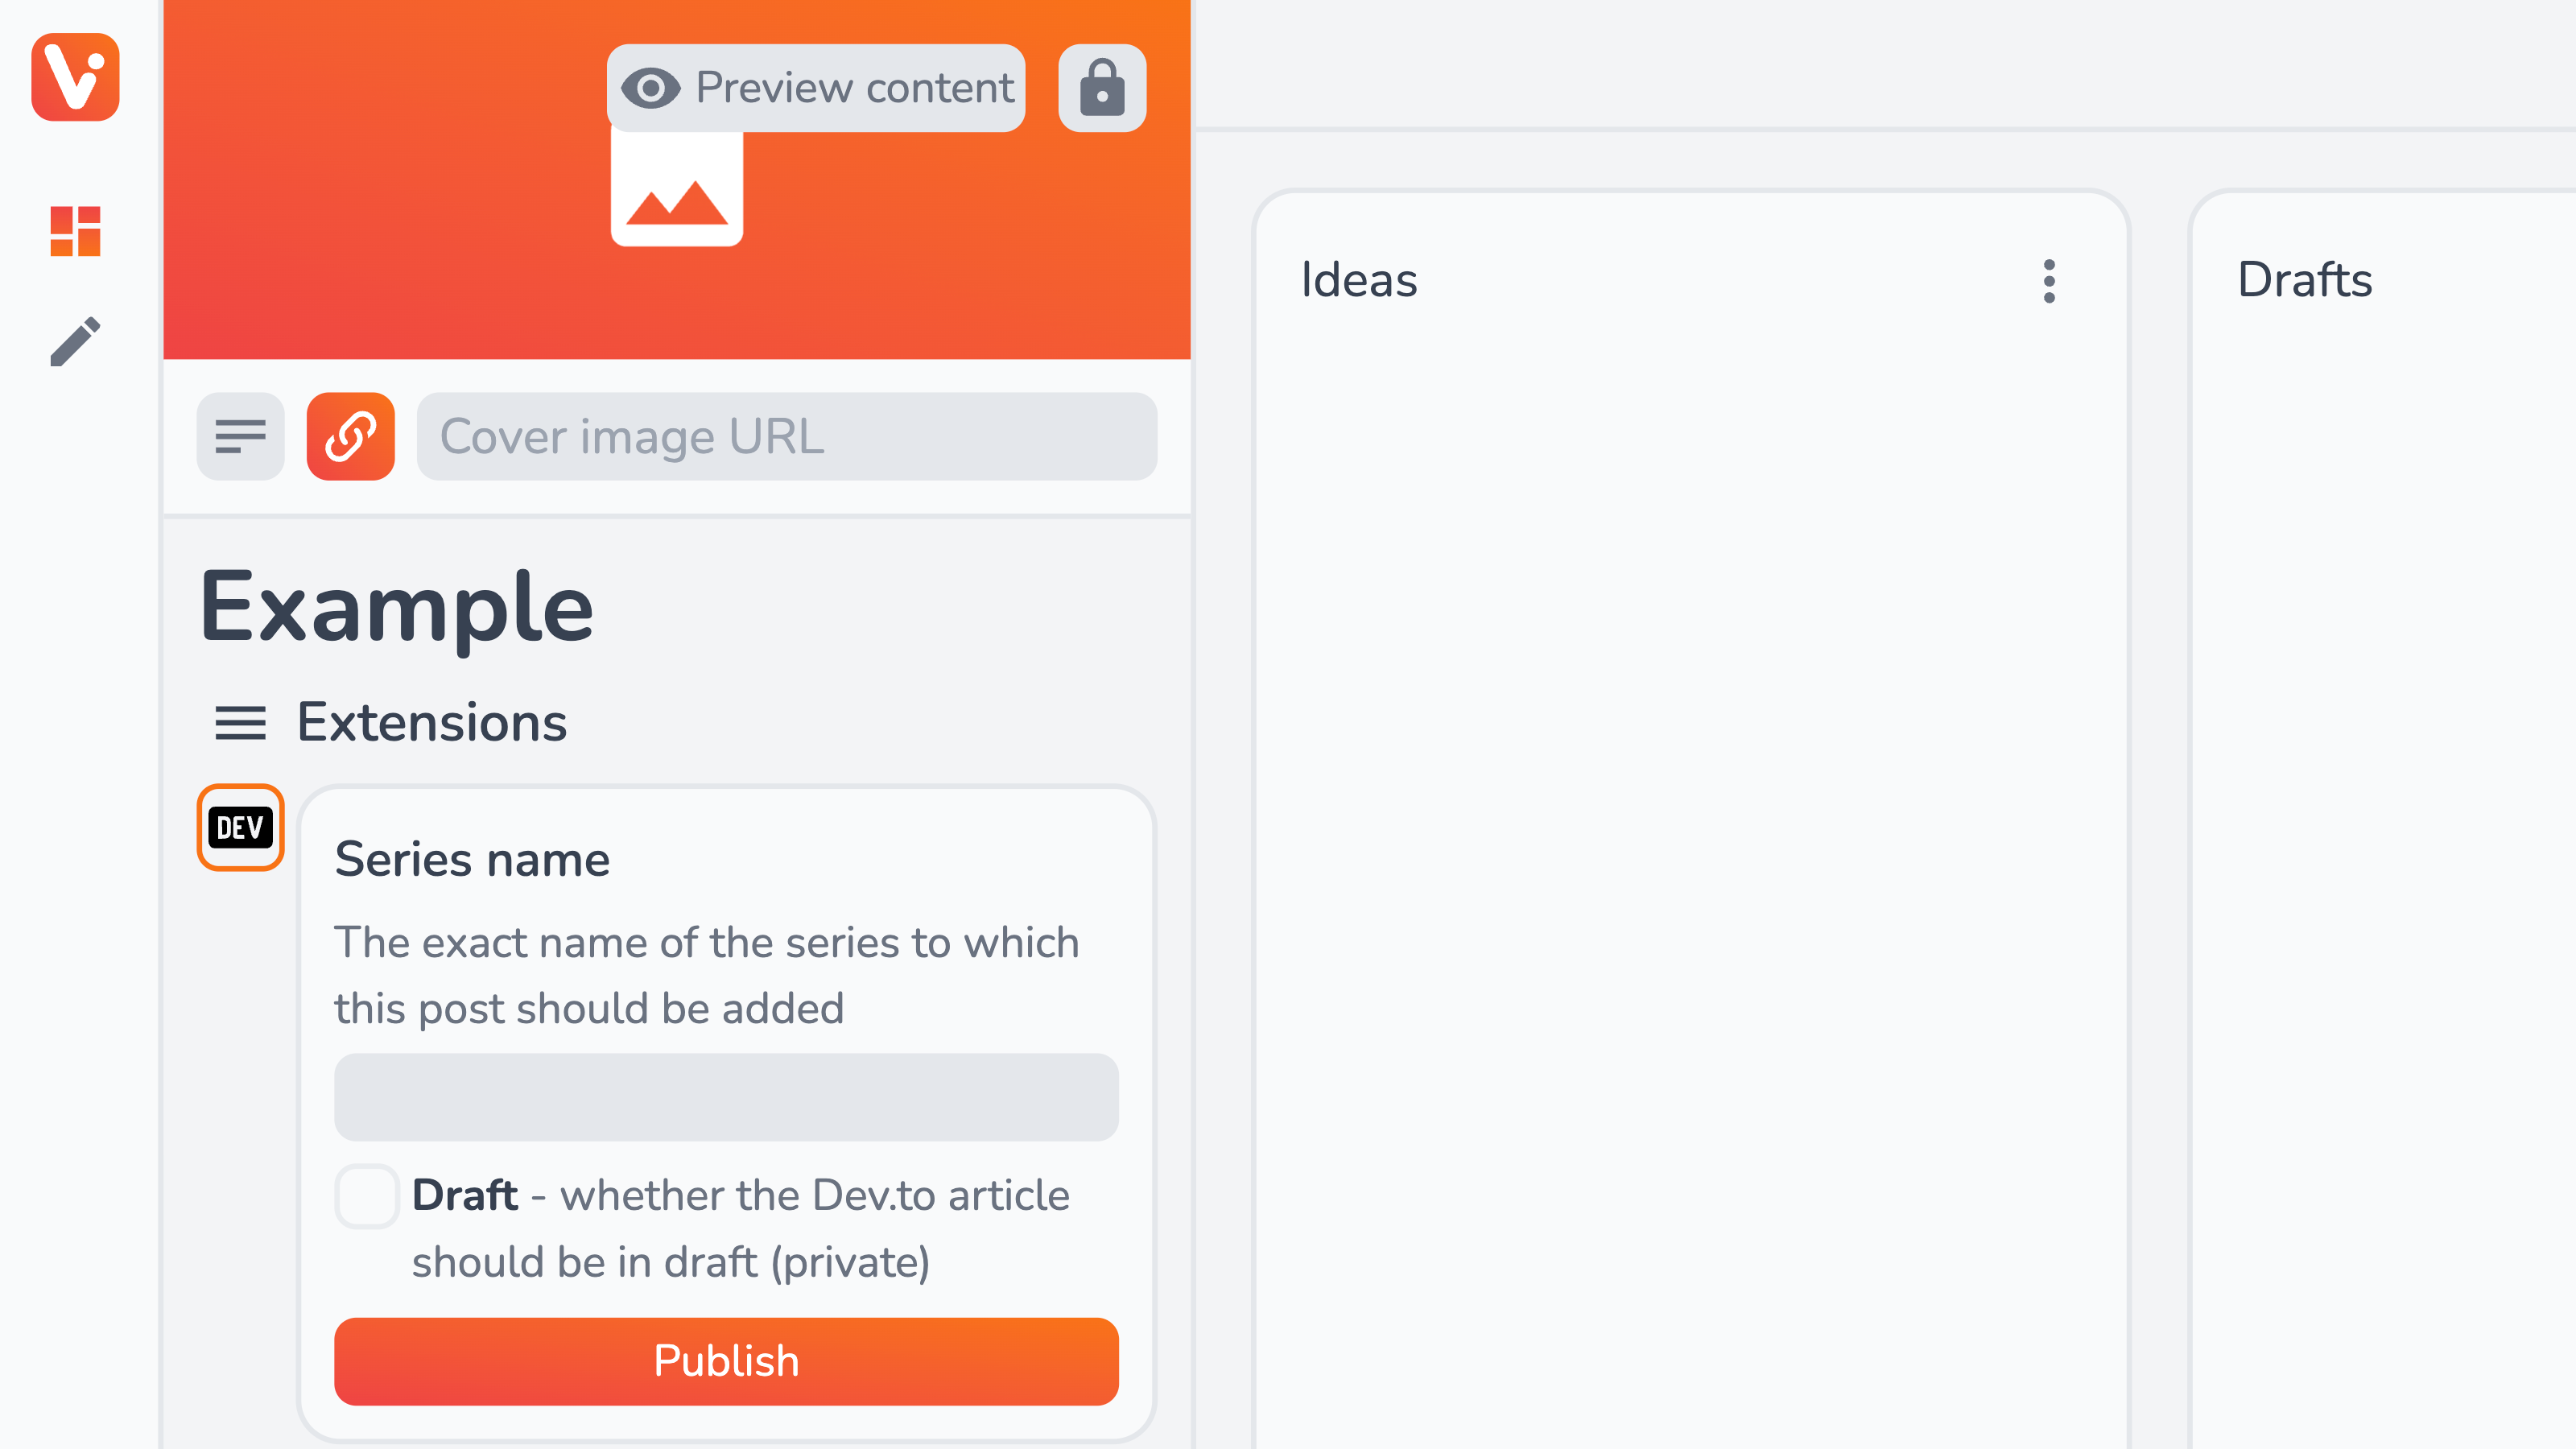
From the content piece view, you can also manually publish (or update) the piece to DEV and further customize options specific to the content piece:
- Series name — the exact series name the DEV article should be assigned to;
- Draft — whether this particular content piece should default to draft state (equivalent to Draft config option by default)
Worth noting is that all the extension data specific to the given content piece, like published DEV article ID or series name, are saved to (and accessible from) the Custom data section:
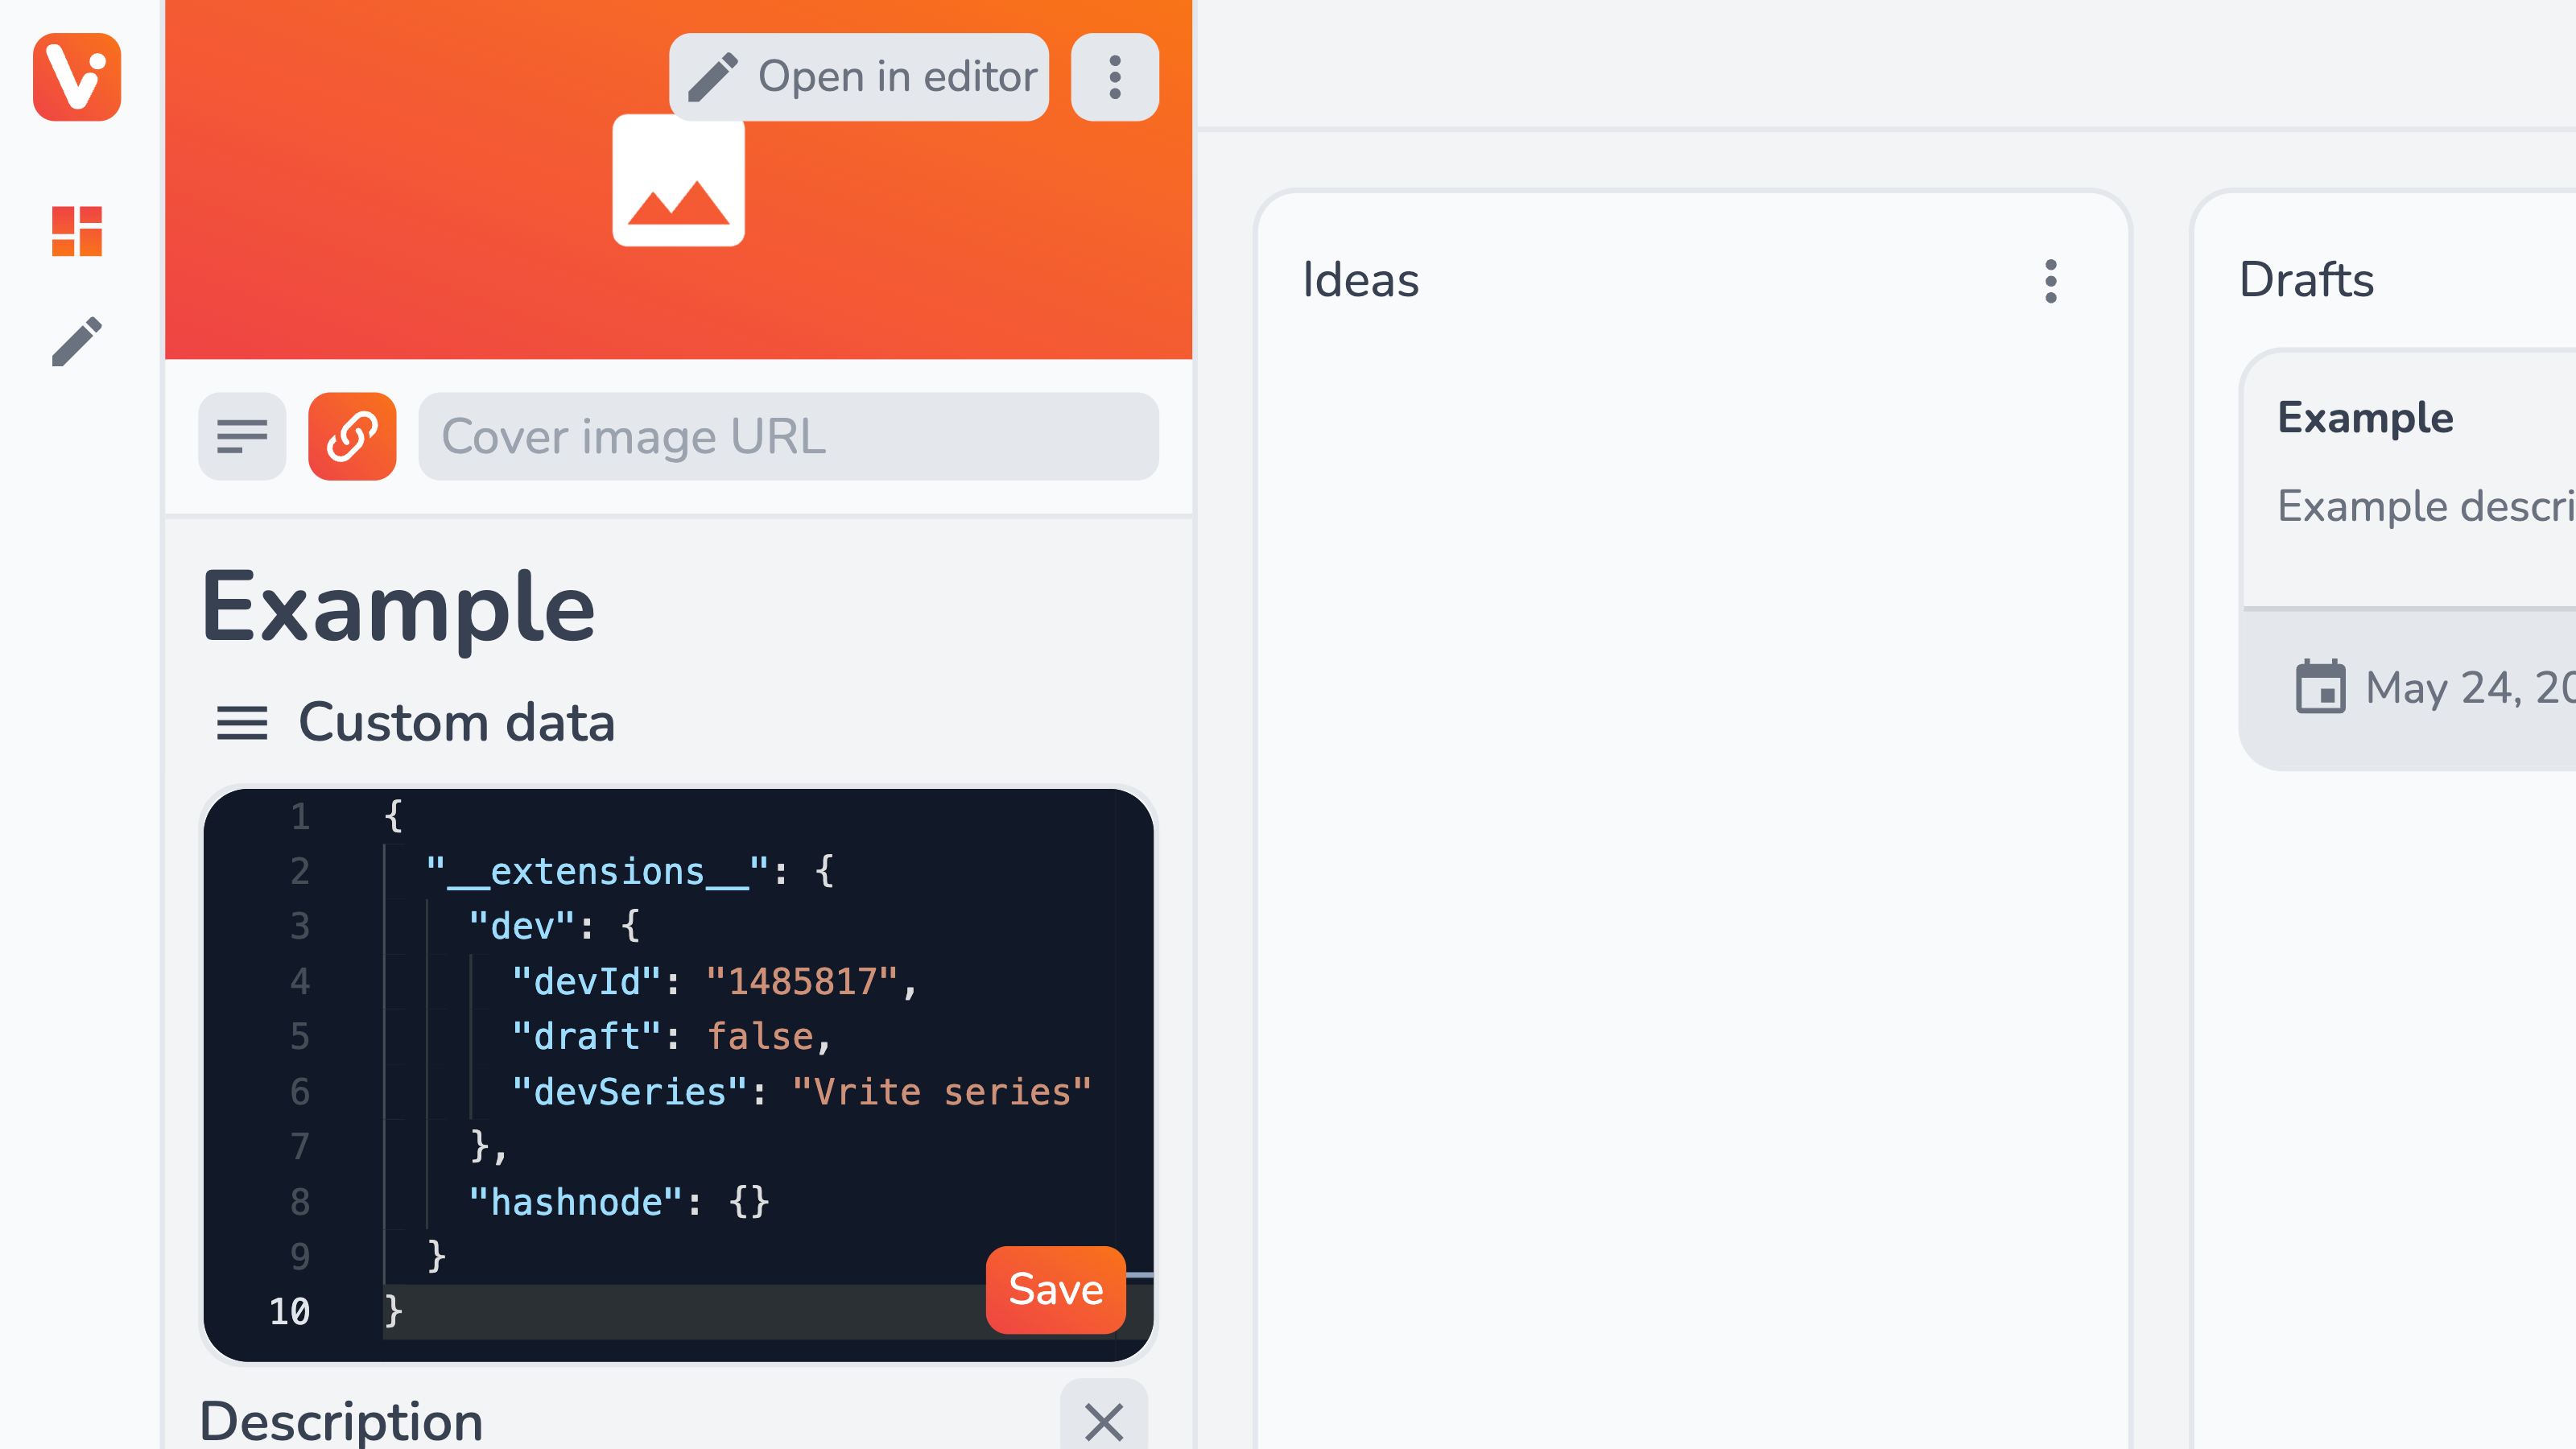
In case you changed something about the DEV article that Vrite is not aware of (e.g. deleted it or renamed the series), you can always edit this data manually to let the extension know.
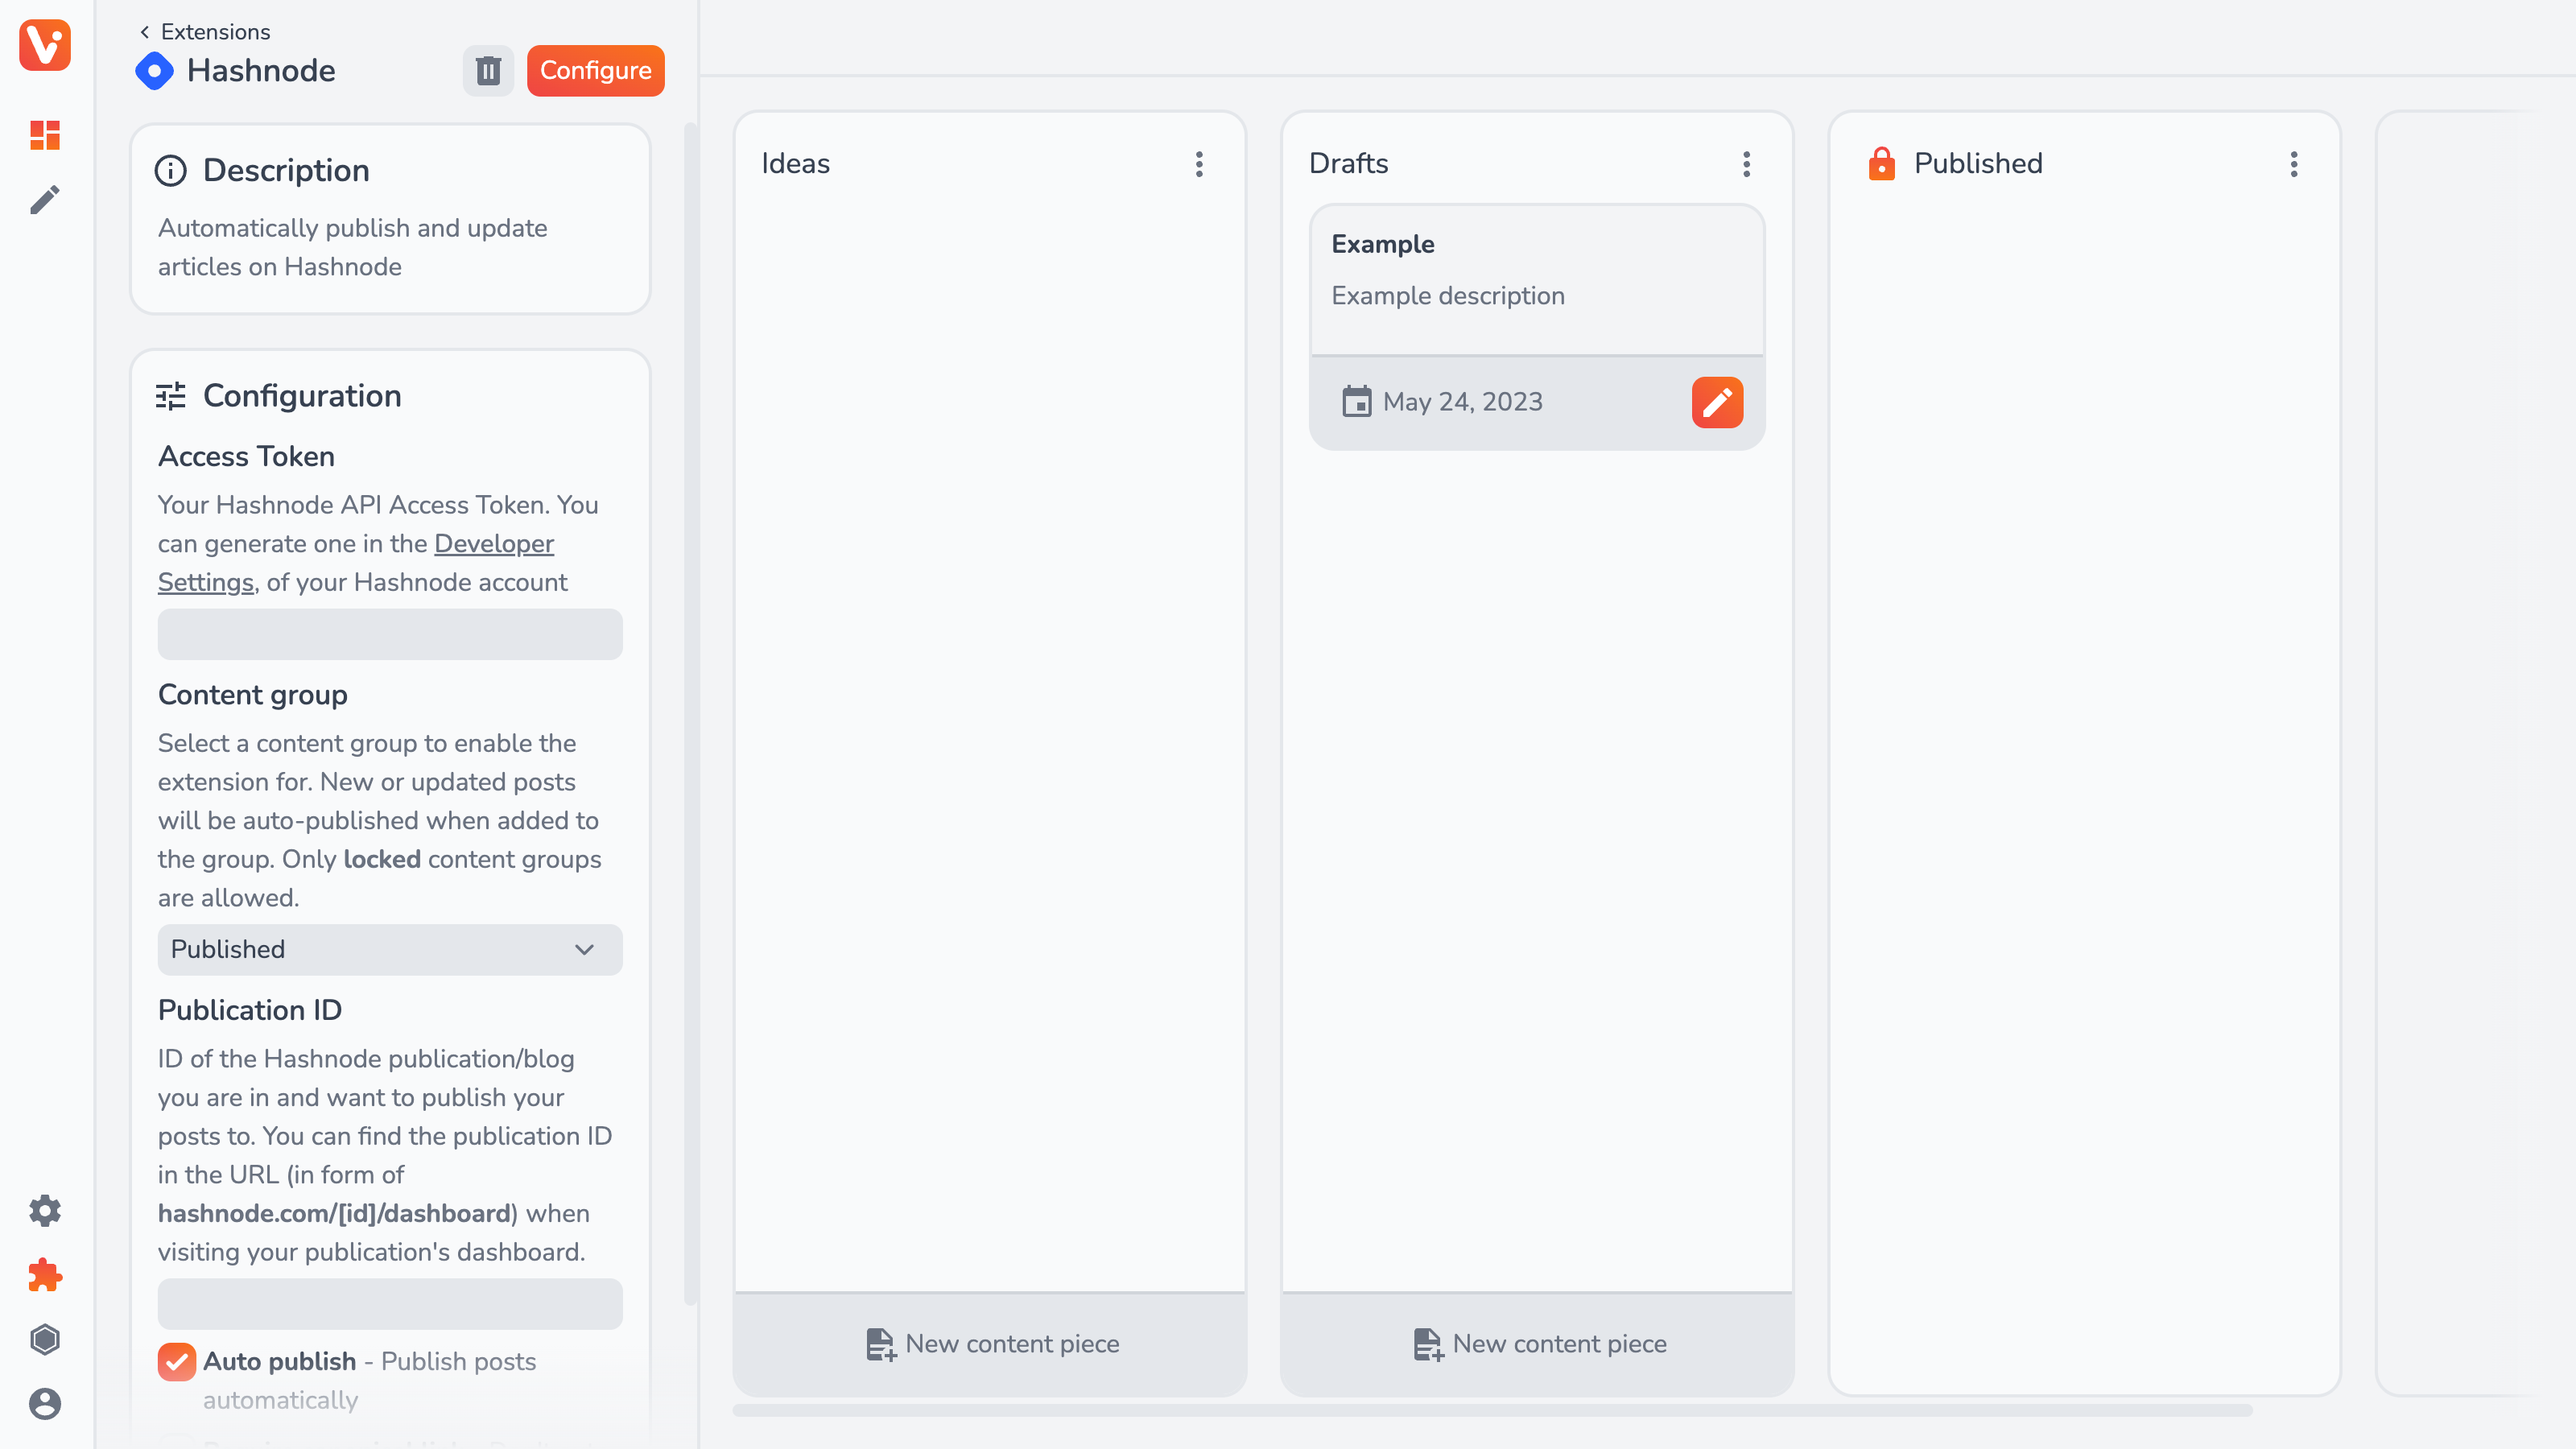
Hashnode Publishing
The Hashnode extension provides options very similar to the DEV one, i.e.:
- Access Token — taken from your Hashnode dashboard to authenticate with the API;
- Content group — a locked content group from which, when a content piece is added, it’ll be published;
- Publication ID — the ID of your Hashnode publication/blog;
- Auto publish — whether or not to register Webhooks for auto-publishing;
- Require canonical link — whether to auto-publishing when no canonical link is added;
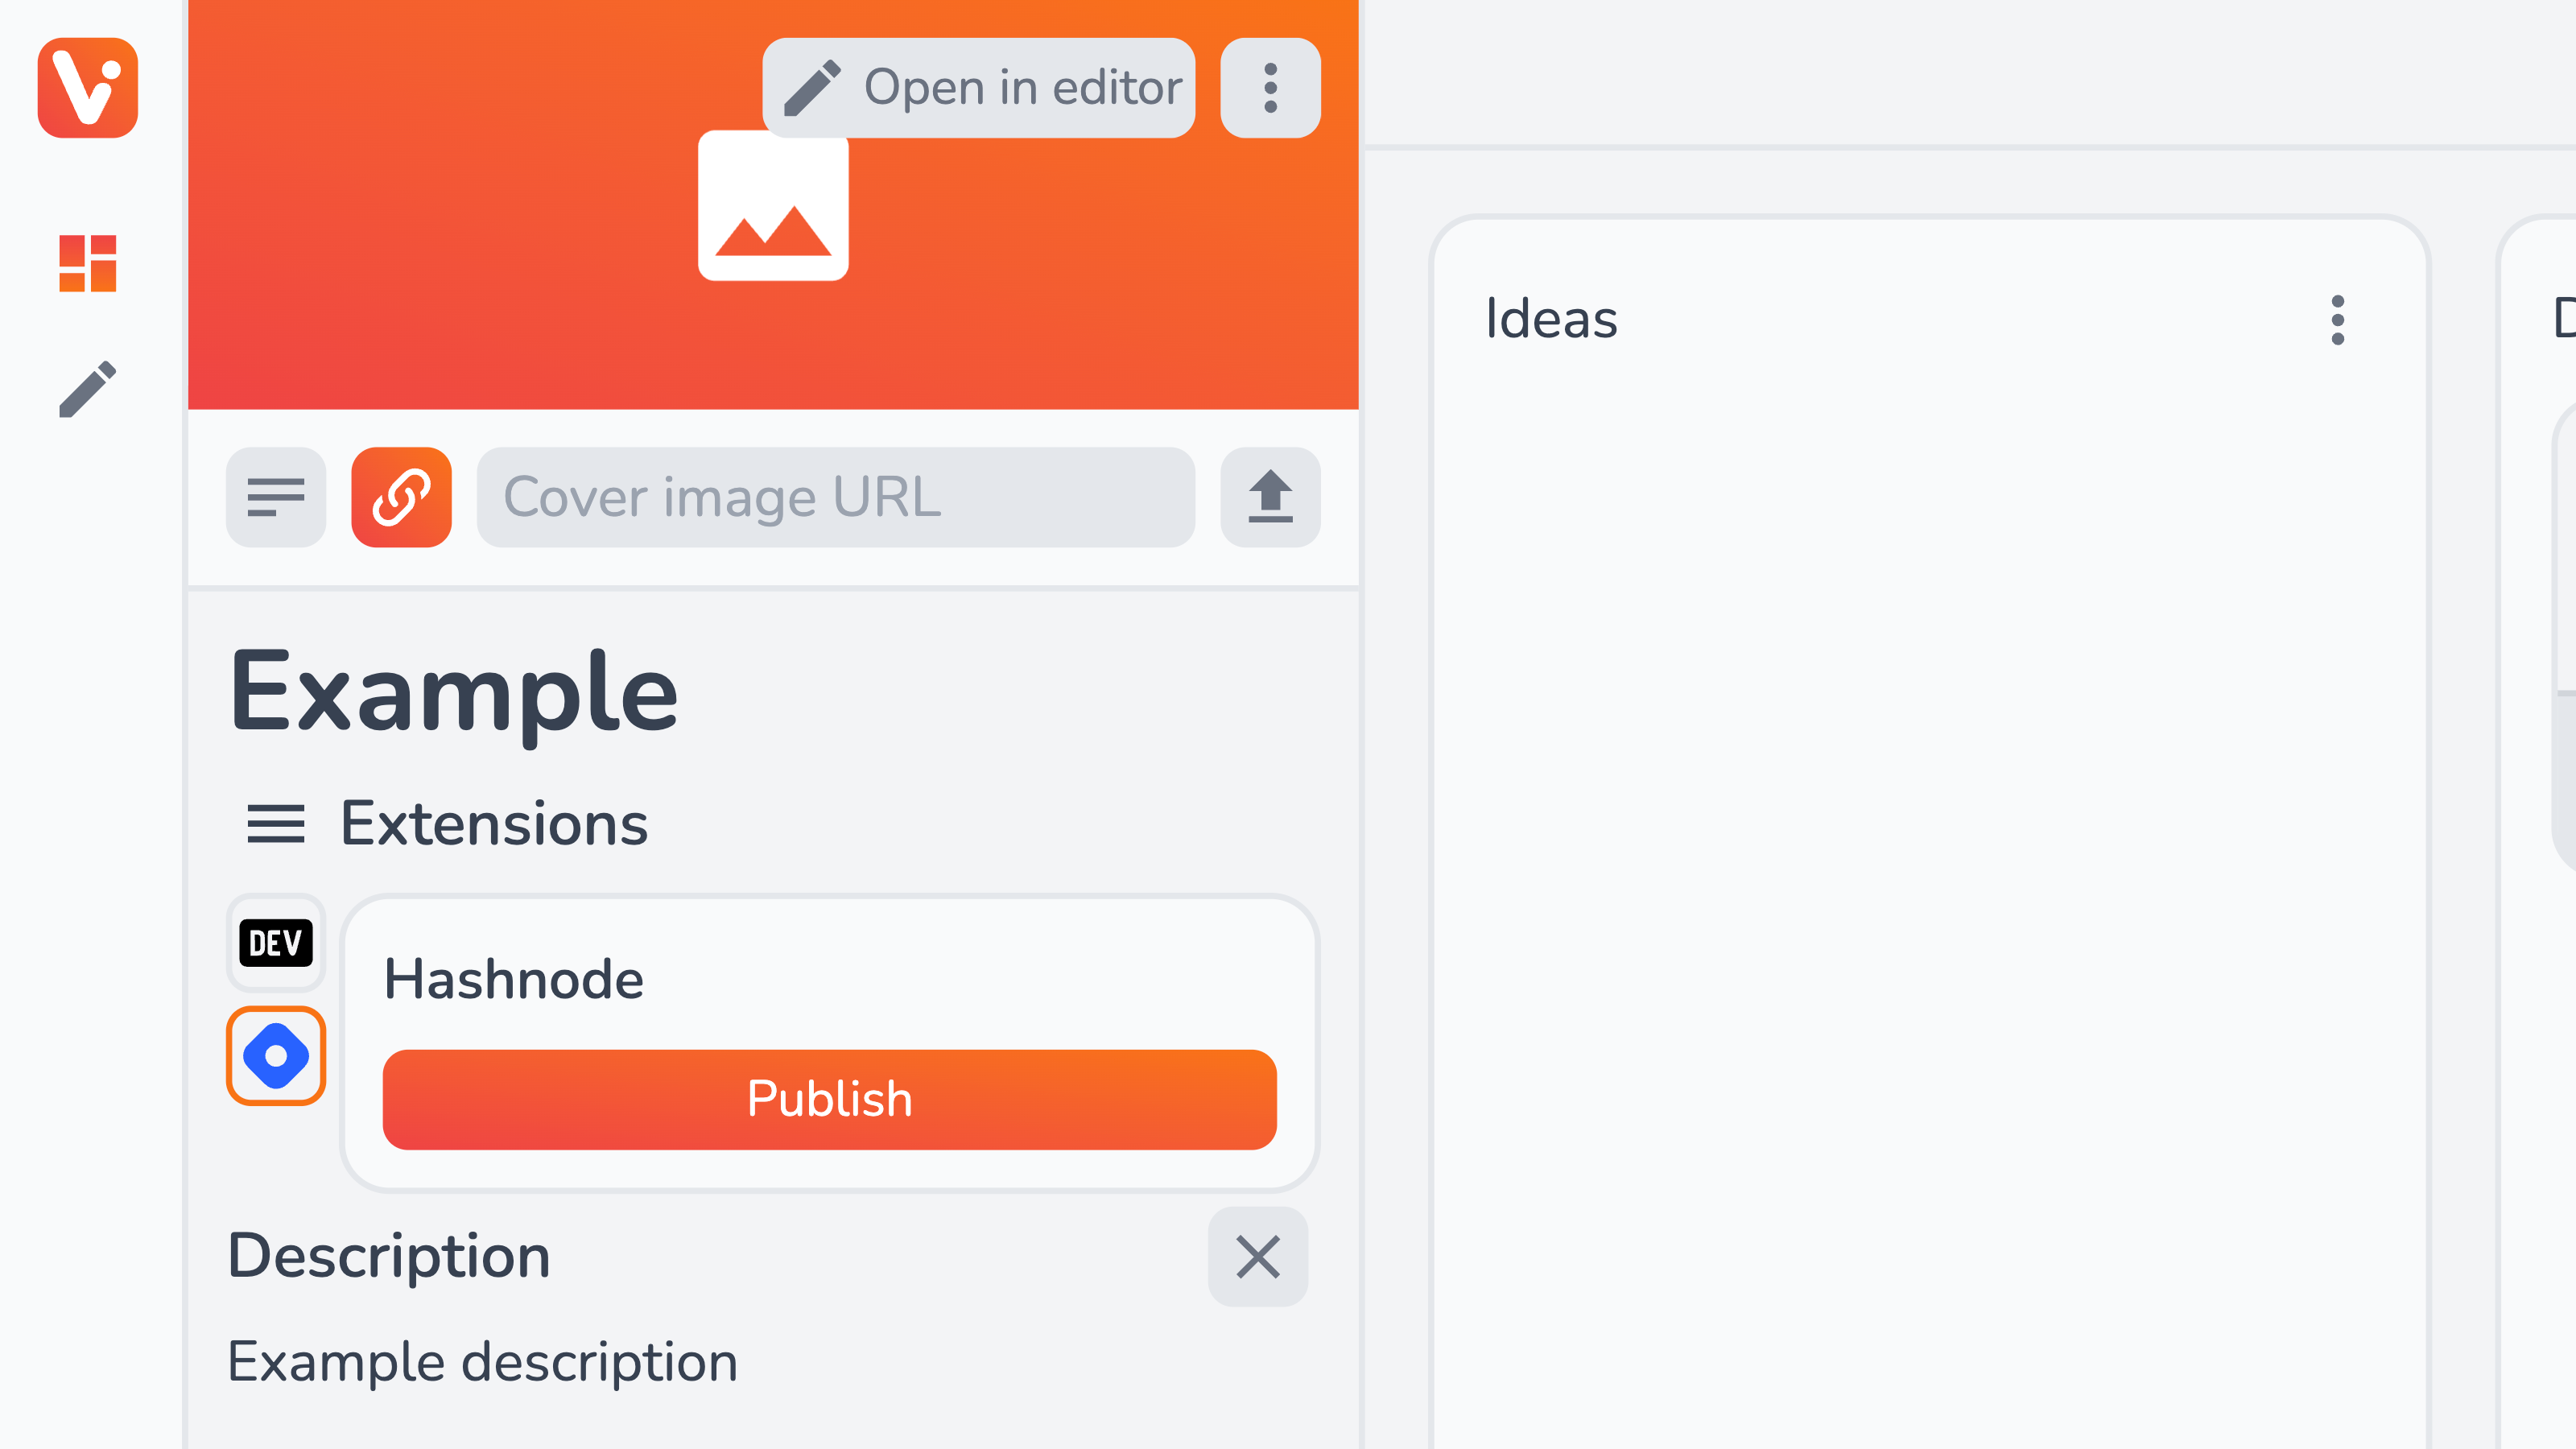
You can also manually publish the Hashnode post from the content piece view:
What’s Next?
With the initial first-party extensions out, what is next for Vrite and its Extension System?
While it is still early, I’m confident that I’m building on (at least) somewhat strong foundations. The plan is to create a full Extension API so that the extensions can do a lot more than just interact with the base API. On top of that, the official extensions will serve as a testing ground for learning about the limits and possibilities of the implemented Extension System to help stabilize and improve it.
Before the Extensions can be created by other developers, I also hope to document and stabilize the development process itself, improving the development experience along the way.
For now, I hope this post provided you with some insights on how to create your own extension system, while also potentially sparking interest in Vrite as your next headless CMS and content creation/management tool for platforms like DEV or Hashnode. If so, consider joining me on this journey to create the best technical writing experience for all developers out there!
- 🌟 Star Vrite on GitHub — https://github.com/vriteio/vrite
- 🐞 Report bugs — https://github.com/vriteio/vrite/issues
- 🐦 Follow on Twitter — https://twitter.com/vriteio
- 💬 Join Vrite Discord — https://discord.gg/yYqDWyKnqE
- ℹ️ Learn more about Vrite — https://vrite.io
- 📕 Vrite documentation — https://docs.vrite.io